Nieuwegein Fashion · Growth edition
Pants Rise Explained: Measure Your Pair Before Comparing Size Charts
Two pairs of pants labelled “high rise” can sit at different heights on the same person. The label describes a cut, but it does not tell you where the…
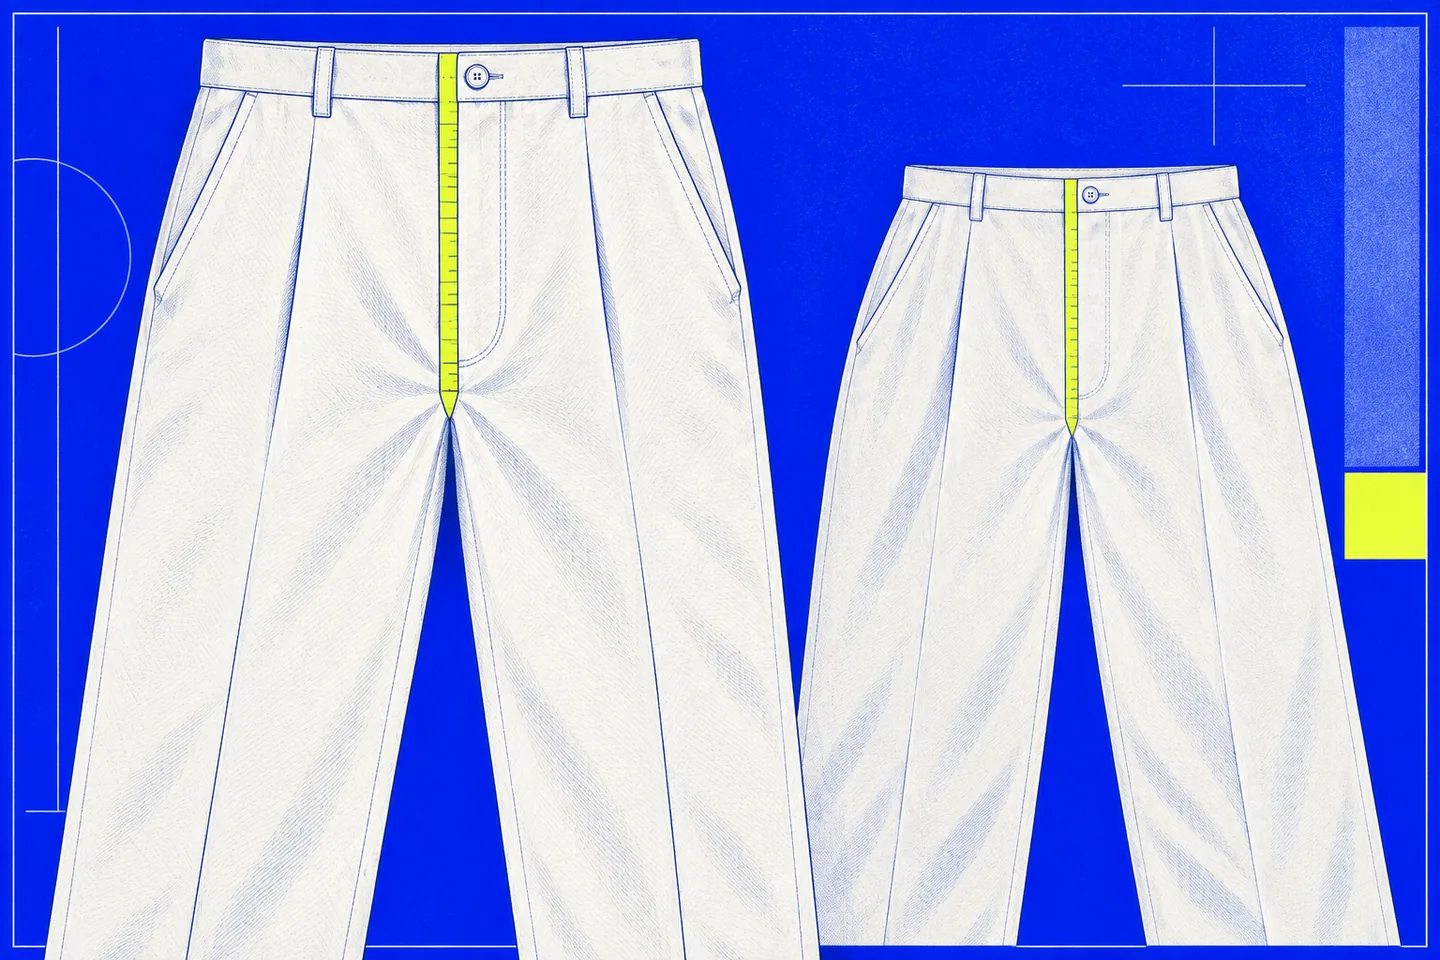
Two pairs of pants labelled “high rise” can sit at different heights on the same person. The label describes a cut, but it does not tell you where the waistband will rest or how the seat will feel. To compare pairs, measure one you already wear, note where it sits when you stand and sit, and use those observations alongside the new pair’s size information.
Keep garment measurements, body measurements and wearing position separate. Front rise is a dimension of the garment. Your waist and hip measurements describe your body. The place a waistband settles depends on both, as well as the shape and give of the fabric.
What front rise measures
Front rise runs from the crotch seam intersection up the centre front to the waistband. Inseam runs from the crotch down the inside leg. Levi’s discusses rise and inseam as separate measurements in its jeans guide. If the waistband sits too high or low, changing the leg length will not address that position.
Check where a measurement ends before comparing figures from different sellers. Measuring to the top edge of the waistband includes its full height; measuring to the seam below it does not. An Orvis garment-measuring guide specifies the endpoint according to the garment’s instructions. For your own notes, choose the top edge and use it every time. If a listing omits its endpoint, treat a small difference with caution.
Measure a pair you know
Choose pants you have worn enough to describe accurately. A pair that feels uncomfortable when seated can still be a useful reference if you record that limitation. Fasten the button and zip, lay the pants face up on a table, and smooth the front without pulling it taut. Leave the waistband in its natural shape.
Find the intersection where the crotch seams meet the inseams. Place one end of a flexible tape there and follow the centre-front seam to the top edge of the front waistband. Keep the tape close to the seam, ease out folds and read the length without stretching the cloth. This crotch-to-waistband method matches the front-rise definition in Naked & Famous Denim’s garment-measuring guide.
Measure twice if the seam is bulky or the waistband curves. Record the unit and the endpoint, for example “front rise, crotch intersection to top edge, 26 cm”. Use the same method for a second pair. Do not measure one flat and the other while holding it up. A difference smaller than the variation between your repeated readings tells you little.
Make sure a seller’s figure is for front rise. Back rise follows the centre-back seam and is a separate measurement; the same guide lists front and back rise separately. Matching front-rise figures leave part of the seat fit unanswered, especially if the backs are cut differently.
Check where the waistband sits
Put on your reference pair and let it settle where you normally wear it. Do not pull it up or push it down to match a style photograph. Stand naturally and note where the top edge meets your body at the front, sides and back. A description such as “just below my navel at the front” is more useful than calling the pair “mid rise”.
Sit in an ordinary chair. Notice whether the front waistband presses into your abdomen, the crotch pulls upward, or the back waistband slips or gaps. Stand and walk a few steps. If you adjust the pants, note what moved and in which direction. The standing position alone may conceal a problem that appears during movement.
Do not use navel height as a universal chart. Torso proportions, waist shape and the fit through the hips and seat vary. A snug waistband may stop lower than a roomier one even when both pairs have the same measured front rise. The wearing check shows where a particular garment comes to rest on you.
Compare waist and hip information too
Measure your body while standing comfortably. Keep a flexible tape level and snug, without compressing your waist; measure your hips around their fullest point. Levi’s product size guide treats waist, hip and inseam as distinct measurements. Consult the chart for the specific product and check whether its figures describe body size, finished-garment size or both.
Your natural waist may be higher than the place where the reference waistband rests. If so, measure around that lower position as well and label both numbers. Do not substitute one for the other when reading a size chart: its “waist” column is only useful if you understand which location and sizing convention it describes.
For a garment-to-garment comparison, measure each fastened waistband while the pants lie flat. If possible, compare the width across the upper hip at the same distance below the waistband on both pairs. Note whether either garment stretches. A flat garment width and a body circumference are different kinds of measurement; keep each beside the corresponding figure from the seller.
If the waistband is elastic, record its relaxed width rather than pulling it to its limit. For a rigid waistband, check whether the button closes without strain on your reference pair. These details help you interpret two similar flat widths: a stretchy pair and a rigid pair can feel quite different at the same point on your body. Keep the measurements descriptive rather than treating a single width as a fit guarantee.
These checks explain why equal rise measurements can produce different results. A tighter waist may stop the pants lower on your body. Less room through the hip or seat may make them pull when you sit. A roomy waist may shift as you move. The rise number remains useful, but it cannot settle those questions alone.
Make a simple comparison note
Write down the following for your known pair and the pair you are considering. Keep the same units and measuring points, and mark anything a seller does not state as “unknown”:
- Front rise from the crotch seam intersection to the top edge of the front waistband.
- Fastened waistband width measured flat, plus the seller’s stated waist-sizing basis.
- Hip or seat width at a consistent point, if that garment measurement is available.
- Where the waistband sits at the front and back when worn.
- Any pressure, pulling, gaping or slipping when sitting and standing.
For the new pair, the last two items remain unknown until you try it on. Even if its front rise matches your reference exactly, a different waistband or seat can change the result. Product photographs may show the general cut, but the pose and waistband placement do not provide a dependable measurement. If a small rise difference matters to you, ask how the seller measured it.
When comparing two listings, check their size charts independently. One seller may give body measurements while another gives the dimensions of a finished garment. If the type of figure is unclear, do not calculate a precise fit from it. Record what you can verify and leave the uncertain item open until you can measure or try on the pair.
Check the new pair while wearing it
Start with the size suggested by the product’s waist and hip information, then let the pants settle naturally. Stand, sit, lean forward slightly and stand again. Check whether the front presses, the seat has room, the crotch feels comfortable, and the back waistband stays in place. If you keep adjusting the pair, record what moves before deciding whether another cut or size would help.
A useful rise note therefore combines one reproducible flat measurement with a short wearing observation. It gives you a concrete reference for comparing cuts without assuming that a “high”, “mid” or “low” label predicts the fit.